In this article we will be going through an example of what variations are in WooCommerce and how you would use them in SyncSpider.
TABLE OF CONTENTS
- 1) Definition
- 2) How to add Variation Products in WooCommerce
- 2.1 Creating and editing Variations in WooCommerce
- 2.2 Adding a new Product to WooCommerce
- 2.3 Adding Attributes and Variations to the product in WooCommerce
- IMPORTANT NOTE: For Variations to show up in your store, you will have to add "Price" for each Product Variation and add stock of it so that WooCommerce and SyncSpider recognize them.
- 3.How to use Variations in SyncSpider
- 3.1 Creating the integration
- 3.2 Target configuration
- 3.3 Mapping
- Name - Name of the attribute
- Option - List of available term names of the attribute
- Visible - Defines if the attribute is visible on the "Additional Information" tab in the product's page.
- Variation - Defines if the attribute can be used as variation.
- 3.4.a) Mapping of Product Attributes
- 3.4.b) Mapping of pa_"variation"
1) Definition
1.1 What are Variations
Variations are attributes that differentiate products from one another ( in this case Parent Variation would be a T-Shirt and the child variations would be the color of the T-Shirt and size)
1.2 What are Variable Products in WooCommerce
Variable products in WooCommerce let you offer a set of variations on a product, with control over prices, stock, image, and more for each variation. They can be used for a product like a shirt, where you can offer large, medium, and small and in different colors.
If you wish to learn more about Product Variations in WooCommerce, please do check their article here.
2) How to add Variation Products in WooCommerce
2.1 Creating and editing Variations in WooCommerce
Before creating a new product with attributes or using an existing one, we have to create Variations and edit them accordingly so that we can use them in SyncSpider.
In WooCommerce, Variations are under "Attributes" in the "Product" section.

Here you can name the variation and choose the slug for it ( A slug is part of a URL that identifies a particular page on a website in an easy-to-read form).

After you have named your variations click on "Add Attribute" and then you can configure it by clicking on "Configure terms".

E.g Creating size Variations and sizes.
Here you can add new size's and configure them to your needs.

2.2 Adding a new Product to WooCommerce
First, we need to add a new product, log in to your WordPress Dashboard and go to "Products" then "Add new".

Name your Product and set the description that you require.
2.3 Adding Attributes and Variations to the product in WooCommerce
Under "Product data" you will choose "Variable product".
Before proceeding to the "Variation" settings, we will need to add Attributes to the Product and save them. Then we will be able to use variations for that particular Product.
Proceed to "Attributes".

And click on "Custom Product Attribute". Then choose the variations you want to edit and save. ( In this case, we will be using Size).

Here you will select all the "Values" that you will be using for that Variations ( You can either choose all or choose a couple of them that you need).

After you have configured your Variation or Variations click on "Save Attributes".

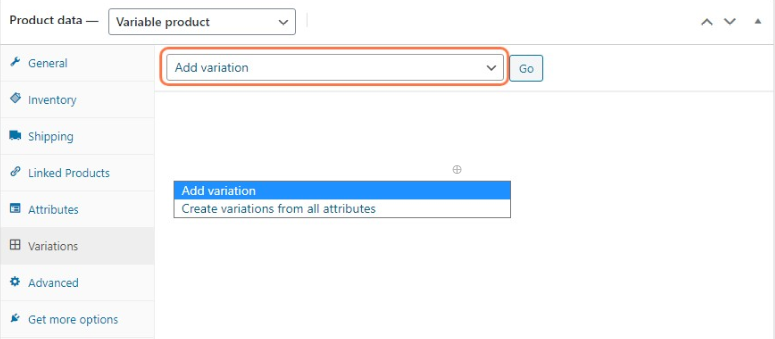
Now we move on to the "Variation" section.
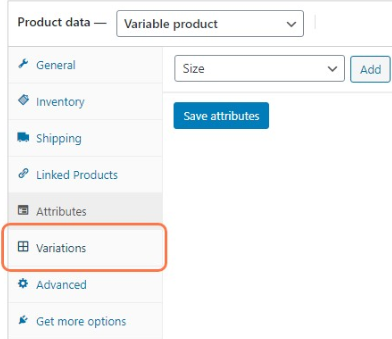
Here you can choose to "Add Variation" or "Create variations from all Attributes".
Choose accordingly to your needs and edit them as you require.
IMPORTANT NOTE: For Variations to show up in your store, you will have to add "Price" for each Product Variation and add stock of it so that WooCommerce and SyncSpider recognize them.
3. How to use Variations in SyncSpider
3.1 Creating the integration
To create an integration check our help article here.
E.G. WooCommerce to WooCommerce
The next steps are after you have created the integration :
Choose "Product" as an entity for both source and destination integration.

3.2 Target configuration
We will again choose "SKU" as the Product (UID) as it is the most simple way to connect our use case.
Set the fields to your preference.
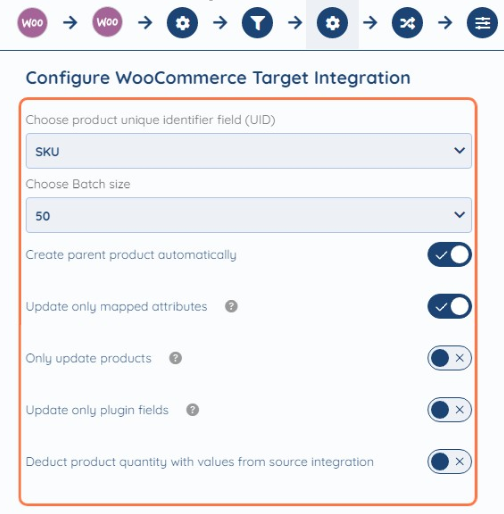
Target Integration Settings:
When and why to use "Create Parent Product automatically" - when the source only sends over Variants.
However, if the source sends the Parent as well then do not use it, as it will generate a Parent SKU that is different from your source's SKU and it will create unnecessary duplicates if you ever wish to transfer them back to the Source app.
Deduct product quantity with values from source integration - This allows you to decrease the product quantity in WooCommerce based on the value received from the source
3.3 Mapping
Map all the "Required Fields" that are in the specific task and map all the fields that you need for this specific task.
There are two ways to add Variations in WooCommerce and you can choose between their Mapping:
1 ."Product Attributes"
With this set up you will only be able to specify 1 Attribute for the desired product with this. (This is a limitation of the WooCommerce API)
However, with this, It will create an Attribute inside WooCommerce dynamically, Meaning that if the Attribute is not defined yet inside WooCommerce, It will automatically be added to WooCommerce
(making it visible as "pa_attributename" in the mapping screen and woocommerce alike)
Product Attribute Fields:
Name - Name of the attribute
Option - List of available term names of the attribute
Visible - Defines if the attribute is visible on the "Additional Information" tab in the product's page.
Variation - Defines if the attribute can be used as variation.

OR
2. pa_"variation" (in our case color is the other variable beside size)

We would recommend using pa_"variation" as you can configure it thoroughly.
IMPORTANT NOTE: When we already have Attributes defined inside WooCommerce and multiple Attributes are being used inside the product the following approach has to be taken
(keep in mind that all the used attributes need to be predefined inside WooCommerce)
3.4.a) Mapping of Product Attributes
To map "Product Attributes" simply connect "Name" (usually the source's field name but can differ depending on the integration) with "Name" .

And "Options" with "Options".

For "Visible" and "Variations" fields use a field "Constant Value" and set it to "true" so that those variations will be visible in Shop and in SyncSpider.

3.4.b) Mapping of pa_"variation"
To map pa_"variation" connect "Values" with "Values". ( You will find them under pa_color)

You can either map "source" and "destination" attributes manually or click on "Automap".

After that simply connect "Visible on frontend" with "Visible on frontend".
And "Used for variation" with "Used for Variation".

With this we will end our help article.
We hope that this covers everything. If you have any further questions or need additional clarification please reach out to us via [email protected] or our Chat Widget!
Was this article helpful?
That’s Great!
Thank you for your feedback
Sorry! We couldn't be helpful
Thank you for your feedback
Feedback sent
We appreciate your effort and will try to fix the article