TABLE OF CONTENTS
Description
Magento is an ecommerce platform built on open source technology which provides online merchants with a flexible shopping cart system, as well as control over the look, content and functionality of their online store. Magento offers powerful marketing, search engine optimization, and catalog-management tools.
Note: Before integrating Magento 2 make sure that:
1. SSL Certificate is up to date and valid
2. Two-Factor Authentication is enabled
3. SyncSpider Magento 2 plugin is properly installed inside your Magento 2 backend
Entities
| Source | Target |
| Category | Product Update |
| Customer | Product |
| Product | Order Update |
| Order | Order |
| Customer | |
| Category |
Possible Task Triggers are: on schedule (hourly, daily, weekly, monthly) or upon successful completion of a trigger task.
Setup
Step 1. Select Magento 2
Either while Creating a Task or in the Integrations menu.
Enter the name of the integration in the search bar.
Step 2. Name the Integration
Enter the Name of the Integration.
You can optionally also enter a description.
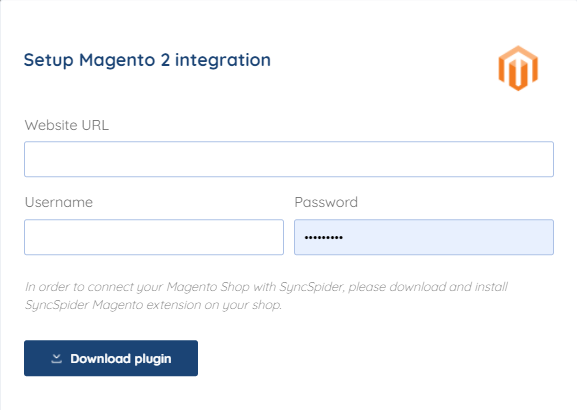
Step 3. Download the Plugin

Download the plugin by pressing the "Download plugin" button or by using the following link:
https://app.syncspider.com/storage/wrappers/magento2.zip
1. Install the extension according to the steps mentioned in the page below:
1.1 Install, manage, and upgrade extensions.
https://devdocs.magento.com/cloud/howtos/install-components.html
1.2 Downloading and pasting method.
1.2.1 Press "Download" to download a module zip file.
1.2.2 Connect to your server via FTP or SSH.
1.2.3 Change your directory to your magento 2 root.
1.2.4 Create folder "SyncSpider" under `<magento2-root>/app/code`
1.2.5 Create folder "APIextension" under `<magento2-root>/app/code/SyncSpider`
1.2.6 extract the module zip file in the folder `<magento2-root>/app/code/SyncSpider/APIextension`
1.2.7 Connect to your server via SSH.
1.2.8 Execute the following commands:
1.2.8.1 change directory to your magento 2 root folder - `cd <magento2-root>`
1.2.8.2 enable maintenance mode - `php bin/magento maintenance:enable`
1.2.8.3 enable the module - `php bin/magento module:enable SyncSpider_APIextension`
1.2.8.4 upgrade database with module information - `php bin/magento setup:upgrade`
1.2.8.5 deploy static view file where <locale-list> is list with all the languages your store
uses, for example, de_DE en_US - `php bin/magento setup:static-content:deploy <locale-list>`
1.2.8.6 clean the cache - `php bin/magento cache:clean`
1.2.8.7 disable maintenance mode - `php bin/magento maintenance:disable`
1.3 Installing using a composer.
1.3.1 Select "Technical details" under the "Download" button.
1.3.2 Copy "Component name".
1.3.3 Connect to your server via SSH.
1.3.4 Execute the following commands:
1.3.4.1 change directory to your magento 2 root folder - `cd <magento2-root>`
1.3.4.2 enable maintenance mode - `php bin/magento maintenance:enable`
1.3.4.3 require the module package - `composer require "<Previously copied component name>" --no-dev`
1.3.4.4 enter credentials if necessary
1.3.4.5 enable the module - `php bin/magento module:enable SyncSpider_APIextension`
1.3.4.6 upgrade database with module information - `php bin/magento setup:upgrade`
1.3.4.7 deploy static view file where <locale-list> is list with all the languages your store
uses, for example, de_DE en_US - `php bin/magento setup:static-content:deploy <locale-list>`
1.3.4.8 clean the cache - `php bin/magento cache:clean`
1.3.4.9 disable maintenance mode - `php bin/magento maintenance:disable`
Step 4. Insert Credentials
Method 1. Plain Authentication
You will be prompted for the Website URL, Username and Password.
You will now be asked for the Website URL, Website URL in this case is Shop URL without any additions to it ( meaning without "/admin" ) and the login credentials.
Shop URL Example: https://myshop.com , it can be your IP adress or it can be custom, it depends on how you set it up.
Method 2. Integration Authentication (2FA)
This method has to be used in order to use Magento 2 with 2FA
log into your Magento 2 admin area.

navigate to "System > Extensions > Integrations"
Press the "Add New Integration" button
fill in the "Name" field which can be whatever identifier, for example, "SyncSpider"
- Under "API" tab set the "Resource Access" to "ALL" to prevent any issues
press "Save"
in the "Integrations" table press the "Activate" button next to the newly created integration

press "Allow" button in the opened modal to confirm the integration API access details

open new tab and navigate to the Magento 2 integration configuration on app.syncspider.com

choose the "integration" authentication type in the "Setup Magento 2 integration" module on app.syncspider.com
Copy the authorized integration credentials from the previous Magento 2 tab into required fields on the "Setup Magento 2 integration" module on app.syncspider.com

press "Save" to save the integration credentials for the SyncSpider Magento 2 Integration on app.syncspider.com.

Magento 2 is just one of the tools we support!
To check the list of the tools and features we support please click here!
If you don't see your favorite tool on our list, please take the time and send us the request here to create an integration for you or UP-vote if it's already on the list :)
We develop integrations based on the requests and up-votes :)
We hope that this covers everything. If you have any further questions or need additional clarification please reach out to us via [email protected] or our chat widget!
Was this article helpful?
That’s Great!
Thank you for your feedback
Sorry! We couldn't be helpful
Thank you for your feedback
Feedback sent
We appreciate your effort and will try to fix the article